If you’re an information worker and serious about work, you HAVE to be using technology as your friend.
I’m not talking about social media. I’m talking about actual software that you can use to run automations, save you time, and 10x your output. If you aren’t learning the skills to operate like this, you’re NGMI.

It’s never been easier to build things. You don’t need to learn computer science, you don’t need to break the bank on a degree, and you don’t need to continually outsource work to somebody else that can code.
You need personal accountability and the ability to use logic.
I built this, I can’t code. You have no excuses.
Here are the steps I took to create this in a day so that you can do the same. If this is helpful, let me know, and I’ll start creating more walkthroughs like this.
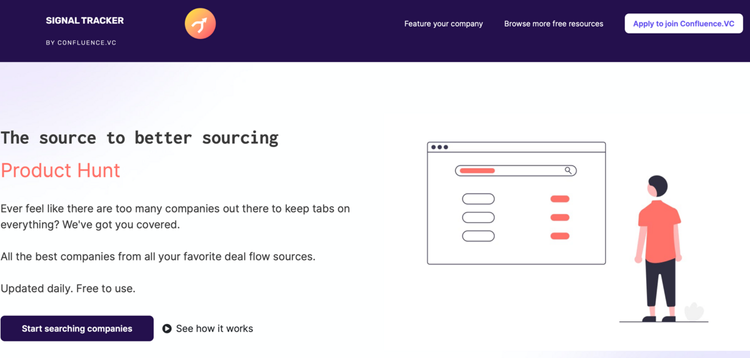
I never liked manually sourcing companies to evaluate, having multiple browser windows open distracts me, and I like centralizing information.
I figured that other investors have similar feelings, so I wanted to create a deal flow scraper that pulls in startup data from some of my favorite databases.
That was the genesis of this idea, so I built this to test it.
I decided not to reinvent the wheel here.
When I look for new startups, I essentially scan four different sources for information:
There are countless of other places to add, but these are the ones I focused on for the first version of this project.
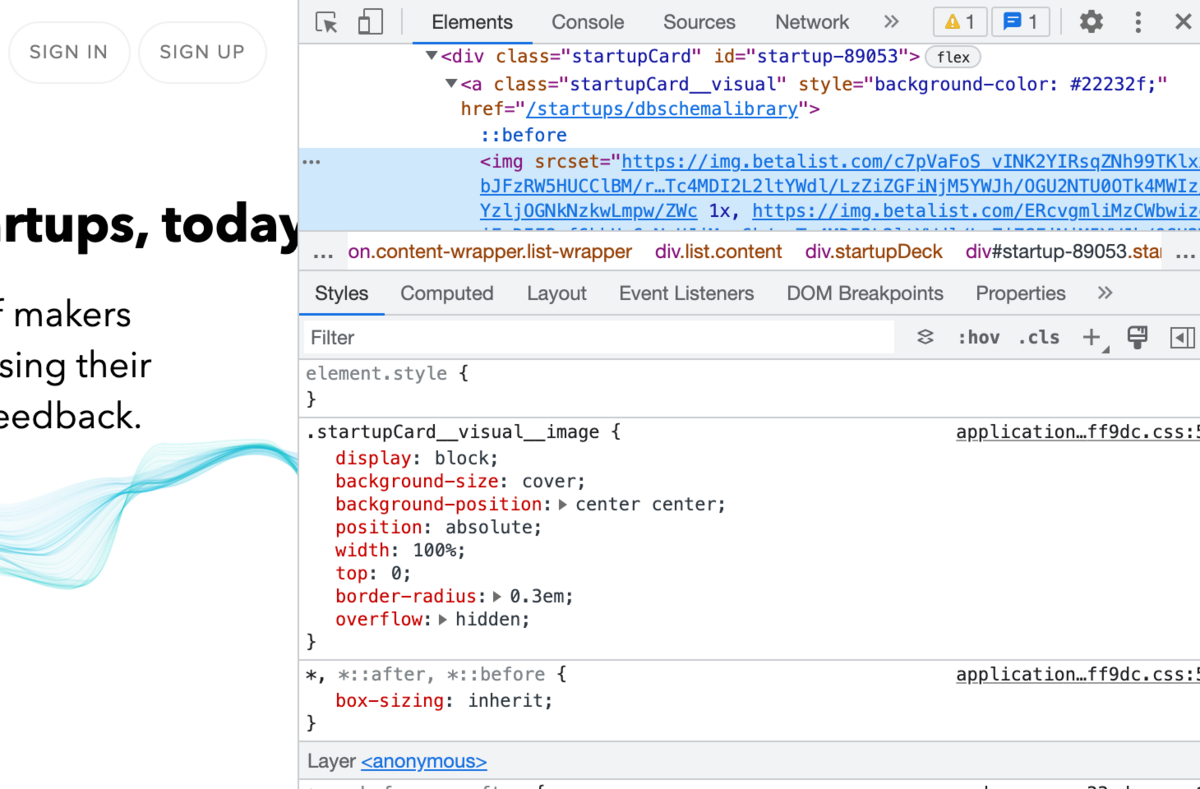
Listing websites (for the most part) will only include a certain amount of information on their landing page (they want you to click in the find the rest of the information).
To understand what you can pull from a website, you first have to understand what elements are actually included on the website. These elements live inside the HTML code of the website, and you can find this code by right-clicking on something within a page and clicking ‘Inspect Element’ (should also be able to press Command+Option+i on your Mac or F12 on your PC). From this view, you’ll be able to see what HTML elements you’ll be able to pull from each page. This includes things like a title, description, and URL.
If you’re non-technical and HTML seems scary, it’s not. Take five minutes to read this overview, and you’ll be good to go.
We tested a couple of different pieces of software before landing on Simplescraper. It’s a Chrome plugin, incredibly easy-to-use, and it matched our budget ($35/month for paid plan).
Once we downloaded the plugin, it was pretty straightforward how to get information pulled in.
Steps:
Now you’ve built a basic scraper, and every day the property data from the website you chose in step 1 will pull into the Google Sheet you created in step 12.
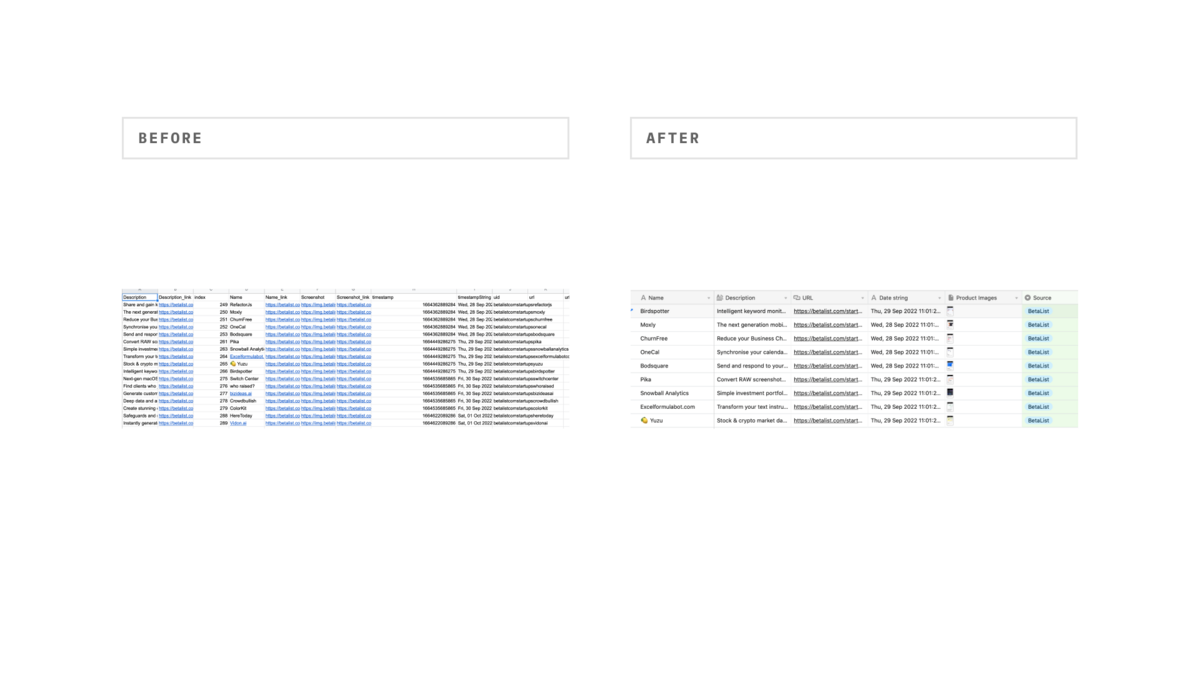
You’ve done the hard work of setting up a system to consistently pull data. Now you want an easy way to make that data presentable.
We recommend doing this by transferring your Google Sheet data over to Airtable, cleaning it up with add ons (optional), and then pulling that cleaned data into Softr.
Here’s how we recommend doing that.
What you need for this step:
If you’re familiar with Zapier and no-code automation, this step is straightforward. If you aren’t familiar with Zapier, they’ll help make this easy once you log into your new account.
The logic is that whenever a new spreadsheet row is created in the Google Sheet for your scraper output, that record will be automatically synced to your Airtable base. When you log into Zapier, you’ll need to create a new Zap. Here’s what you input when instructed to do that:
The trigger: New spreadsheet row created in Google Sheets
The action: Create new record in Airtable
Alternatively, you can just copy the Zap we’ve already made (linked HERE).
Some sites make it hard to scrape image data, so this is a workaround if presentability of your data matters to you. Skip to the next section if that’s not you.
What you need for this step:
The trigger: New record is created in Airtable
The action #1: Generate screenshot URL from Urlbox
The action #2: Update record in Airtable
Alternatively, you can just copy the Zap we’ve already made (linked HERE).
What you need for this step:
If you’re still following along, you’ve found a website to scrape, you’ve developed a system to consistently scrape website data into a Google Sheet, and you’ve transformed that data into something presentable by adding images if they weren’t otherwise available.
Now comes the fun part to make all of that hard work look like a real application.
We recommend using Softr for this step. We started using their software two months, and it’s given us superpowers.
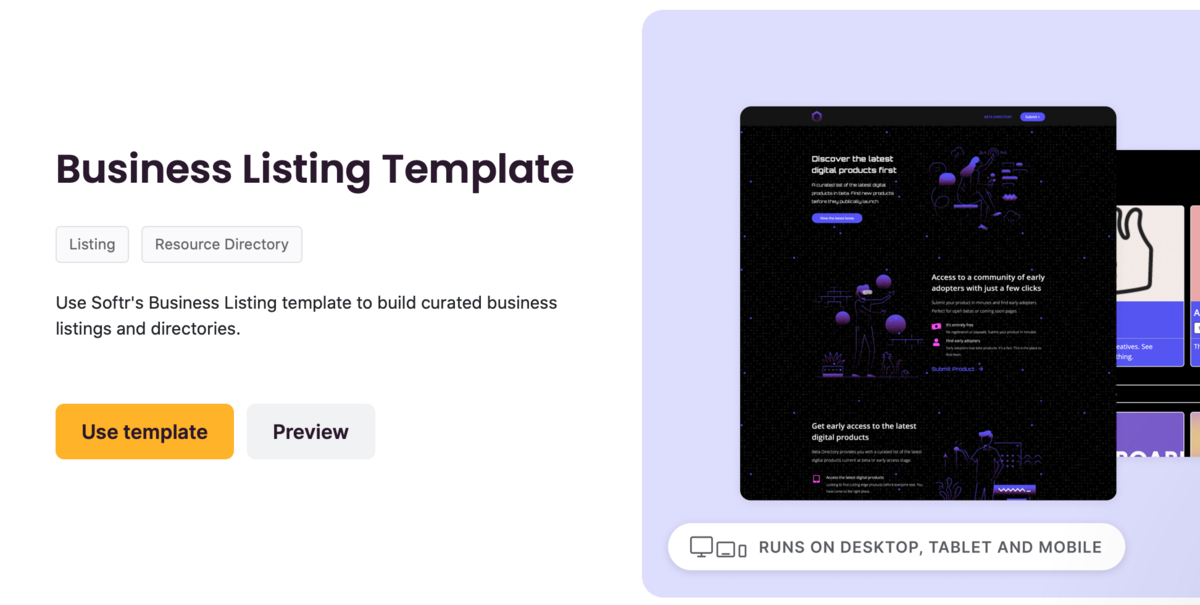
After you create an account (they offer free trials), you’ll need to select an existing template to get started.
This is a matter of personal preference, but if you plan on building something similar to this, you’ll want something with lists built in. Most of these are in the ‘Resource Directories’ section of the templates.
When you click into your new app, it will be filled with dummy data.
To change this, you’ll need to click into the list section within Softr, click into ‘Data’ on the right side of the screen, and connect to your Airtable base you built in the previous step.
If you are using Softr for the first time, they will ask you for your Airtable API key to authenticate yourself first. If you’re struggling to get that set up, Softr has made a walkthrough explainer, and I’ve linked it here.
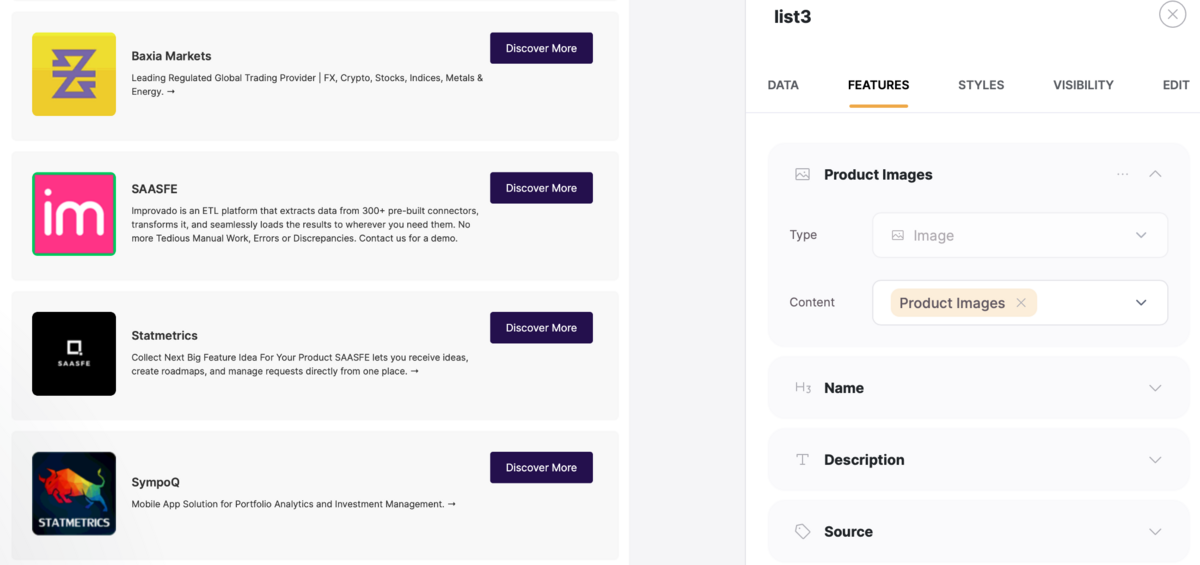
Almost done. Now you have the right data in Softr, and you just need to map it correctly.
In the list section of Softr, go into ‘Features’ and for each of the items fields, map to the correct data, re-name it show it has the correct label, and remove any unnecessary items.
If you have a button or something similar and want to redirect people to a URL when they click into that button, you have two options:
That’s it! You’ve now taken a project from 0 to 1, and you have a tool you can use to automate the collection of whatever information you want.
This post is brought to you by:
Softr: The easiest way to build professional web apps on top of Airtable
If you’re using Airtable to store data, you HAVE to layer Softr on top.
Their software lets you turn your ugly databases into beautiful web apps. We’ve used Softr to build our investor directory, public roadmap, and the Signal Tracker that this newsletter walked through how to build.
Get started with their free plan, and try out any of their paid plans at no cost for 30 days.